
Microsoft Excel is a powerful tool for organizing, calculating, and analyzing data. If you are new to Excel, understanding its interface is the first step. In this guide, we will explain the different parts of the Excel screen in a simple way.
1. Title Bar
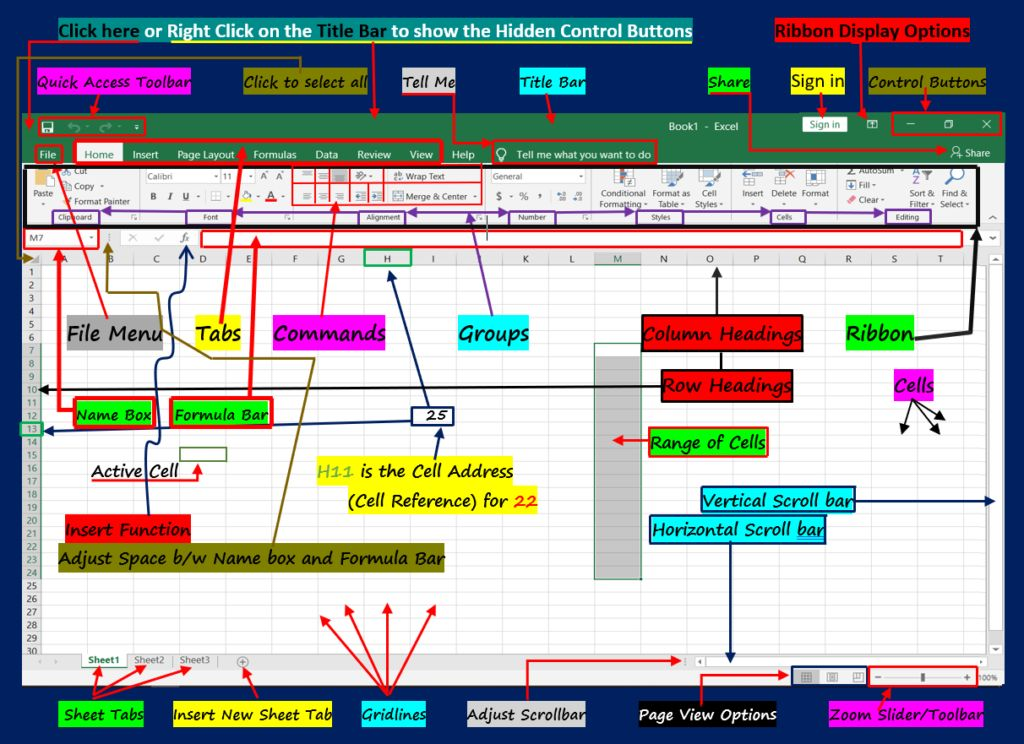
The Title Bar is at the top of the Excel window. It shows the name of the current file. If your file is new and not saved, it will be named “Book1” by default.
2. Quick Access Toolbar
The Quick Access Toolbar is located at the top left. It contains shortcuts like Save, Undo, and Redo. You can customize it by adding more tools that you use often.
3. Ribbon and Tabs
The Ribbon is the menu bar at the top, divided into different Tabs like:
- Home: Basic formatting and editing tools.
- Insert: Add tables, charts, and pictures.
- Page Layout: Adjust page settings and print options.
- Formulas: Work with different formulas and functions.
- Data: Manage and analyze data.
- Review: Check spelling, add comments, and protect sheets.
- View: Change how you see the worksheet.
Each Tab contains Groups of related commands. For example, in the Home Tab, you will find Groups like Clipboard, Font, Alignment, and Number.
4. File Menu
The File Menu (also called Backstage View) lets you open, save, print, and share your work.
5. Name Box and Formula Bar
- The Name Box (on the left) shows the address of the selected (active) cell.
- The Formula Bar (next to the Name Box) is where you enter or edit formulas.
6. Cells, Rows, and Columns
- Cells are small rectangles where you enter data.
- Rows are horizontal (left to right) and are numbered (1,2,3,…).
- Columns are vertical (top to bottom) and are labeled with letters (A, B, C,…).
- A Cell Address (Cell Reference) is a combination of column letter and row number, like A1 or H11.
- A Range of Cells is a group of selected cells.
7. Scroll Bars
Use the Vertical Scroll Bar to move up and down and the Horizontal Scroll Bar to move left and right in your worksheet.
8. Sheet Tabs
At the bottom, you will see Sheet Tabs like Sheet1, Sheet2, and Sheet3. Click on a sheet tab to switch between different sheets in the same workbook. You can also rename or add new sheets.
9. Gridlines
The light gray lines that separate cells are called Gridlines. They help organize data but do not appear when you print unless you enable them in Page Layout.
10. Zoom Slider and Page View Options
At the bottom right, you can adjust the zoom using the Zoom Slider. Next to it, the Page View Options help you switch between different views like Normal, Page Layout, and Page Break Preview.
Final Thoughts
Now that you know the Excel interface, you can start working with data efficiently. Whether you are a student, professional, or business owner, Excel is a great tool for organizing information. Keep practicing, and soon, you will be an Excel pro!
For more simple and useful guides, visit Canadian Updates!


